I previously tried to use Scrapy to crawl information from a drug website, but I didn’t make any records at the time. This time, I helped a classmate crawl some data, so I decided to record it this time.
Introduction
Scrapy is a Python framework specifically designed for web crawling. Compared to manually sending requests and parsing information using libraries like requests, Scrapy provides built-in functionalities such as request handling, response parsing, exception handling, task queue management, etc., allowing us to perform data crawling tasks in a more professional manner.
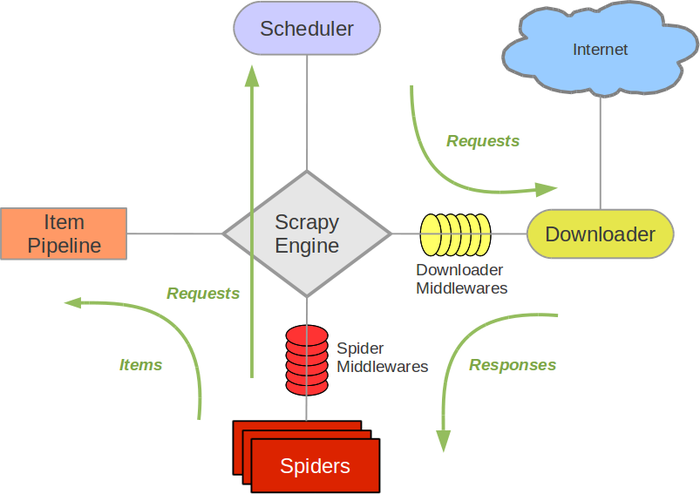
Of course, the cost is… the learning curve has increased slightly because we need to understand some basic concepts and working principles of this framework. I initially tried to follow the tutorial on Coder’s Tutorial website… but I was completely confused by the diagrams:

Case Study
To simplify things… I only recorded the parts of the actual operation that needed to be understood.
1. Create a New Project
First, Scrapy as a framework does not require users to write code line by line from scratch; instead, it allows us to write operation-related methods within an existing template. When starting a new project, use scrapy startproject demo to create a new project.

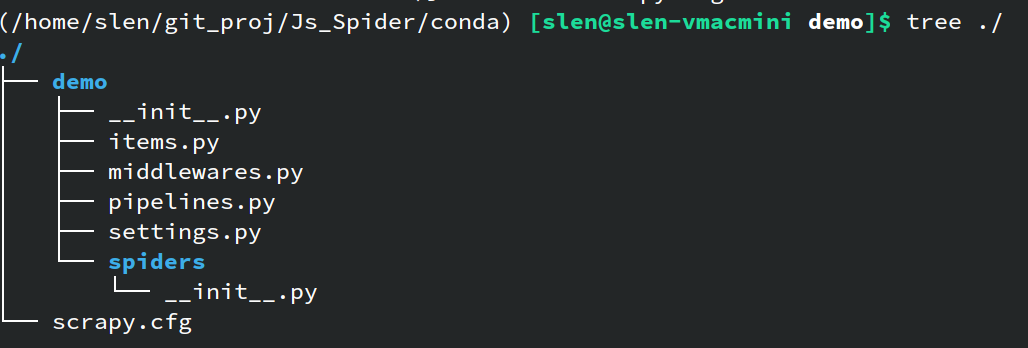
After creation, the project directory contains many files. You don’t need to understand all of them; just be familiar with the following:

demo/spiders: The directory where spider files are stored. Initially, if no spiders have been created, this directory will only contain__init__.py. The specific content of the spiders will be introduced later.demo/settings.py: The configuration file for the crawler, including request headers, anti-crawling protocols, task intervals, cookie settings, etc. Most settings can be understood by reading the comments in the file; just set them accordingly.demo/pipelines.py: Corresponds to the Item Pipeline shown in the example diagram. This is where we define how items are processed. When using the built-initemobject to collect target information, this needs to be set up.demo/items.py: The file where items are defined. Similar to above, when using items, they need to be defined in this file (mainly defining what should be stored in an item).
2. Create a Spider
Spider files need further generation using scrapy genspider. For example, running scrapy genspider dSpider www.sample.com will generate a spider file named dSpider.py in the demo/spiders/ directory. The content of this file is roughly as follows:
1 | import scrapy |
Using the spider essentially involves rewriting methods within this generated spider file. For instance, here is what I wrote:
1 | import scrapy |
The parse method defines how the spider processes the response content after visiting a URL. There are multiple ways to handle this. If you want to follow Scrapy’s recommended approach, you can extract the necessary information from the response content and store it in an item, which will then be processed by the Item Pipeline. This way, the collected items will be packaged as items and enter the Item Pipeline for further processing and saving.
If you prefer not to use the Item Pipeline, you can directly handle the data within the parse method, such as creating a DataFrame and writing the content directly to a file. In this case, there is no need to go through the pipeline.
The choice of which approach to take depends on your specific task requirements.
3. Process Items
If you choose to use items, you also need to write processing logic in demo/pipelines.py:
1 | # Define your item pipelines here |
- The
open_spidermethod is executed when the spider starts. It typically opens a file for writing or connects to a database for initialization. - The
process_itempart defines how each item returned by the spider should be processed. In this case, I store the original JSON string in a file and replace keys to create a dictionary. - The
close_spidermethod is executed when the spider has finished collecting all information. Here, I convert the dictionary into a DataFrame and write it to a file, closing the file handle.
4. Other Settings
If you need to change request headers, set up proxies, or configure access intervals to prevent IP bans, you can modify the demo/settings.py file accordingly.
5. Run the Spider
This is the simplest part. Navigate to the project directory and run scrapy crawl demo. You can then observe the running status; logs will be printed directly on the screen, allowing for debugging based on the logs.
Summary
That’s it for the basic usage. In summary, we need to define what website the spider should crawl, and in the parse method, we specify how to parse the content of the request response.
Extension
The case study I recorded has a prerequisite that the responses obtained through simple GET or POST requests contain the data we want to retrieve. However, with the development of web technologies, more and more websites are no longer static HTML sites; most websites now have some content loaded via JavaScript, or even entire pages rendered by frameworks like React or Vue. In such cases, simple requests cannot fetch the desired data.
I will record this in a future post.
That’s it~


