After putting in a lot of effort to get the hardware sorted out, it’s time for the software.
Following my previous plan, I wanted my machine to be multi-functional: the host Linux system for computation and a virtual Windows system for gaming.
Anyone who has used virtual machines knows… the performance is always an issue. Even with top-tier products like VMware and Mac-specific Parallel, their graphical performance still falls short of native hardware. That’s why PCI Passthrough technology came into play. It allows PCI slot devices to be isolated from the host and directly allocated to the virtual machine, achieving almost-native performance without any middlemen. This is also the reason I bought a motherboard with two PCI slots; if I ever wanted to run two gaming PCs in virtual machines, each would need its own dedicated graphics card, and the host needs an integrated graphics card as well.
This virtualization setup uses Manjaro as the host system. References for this configuration include:
Since this configuration is based on an Arch-based distribution, the specific commands and components used will differ from materials found in Chinese websites (which are mostly based on Ubuntu).
Steps
1. Prepare the System Disk
- Host System: manjaro-architect-18.0.4-stable, a derivative of Arch Linux known for its simplicity and ease of use. Despite being considered heretical by the Arch community, it has gained significant popularity (even I saw Manjaro’s community open a company similar to Ubuntu). Using Architect instead of a pre-installed desktop live CD is mainly because the image is small, with all software packages downloaded over the network.
- Subsystem: Different from the host system, the subsystem needs to prepare an installation disk for Windows and possibly an EFI-bootable ISO image. The ArchWiki tutorial uses OVMF (which simplifies PCI passthrough by reducing the need for configuring virtual BIOS), which means the virtual machine will use EFI (only) instead of BIOS. This requires the installation system’s ISO image to support EFI boot. However, I downloaded many installation images that don’t support it… so I had to find a PE image that supports UEFI and used this image to boot and install another installation image on top.
2. Install the Host System
Install Manjaro using the host system disk on your computer. Detailed steps can be found elsewhere, so I’ll skip them for now (I’ll add screenshots later when I have time).
3. Set Up GPU Isolation
To achieve PCI passthrough, we need to prevent the host from accessing the hardware. The specific settings are as follows:
- Enable IOMMU
- Edit the configuration file (
/etc/default/grub) to change kernel parameters and enable IOMMU:1
2
3
4...
GRUB_CMDLINE_LINUX_DEFAULT="quiet udev.log_priority=3 audit=0 amd_iommu=on iommu=pt"
GRUB_CMDLINE_LINUX=""
... - After making the above changes, regenerate
grub.cfg:1
sudo grub-mkconfig -o /boot/grub/grub.cfg
- Edit the configuration file (
- Edit the configuration file to use vcfio to block the PCI devices to be isolated
- Use the
lspci -nnkcommand to view all PCI hardware information, find the device IDs of the hardware you want to passthrough, and record them:1
2
3
4
5
6
7
801:00.0 VGA compatible controller [0300]: Advanced Micro Devices, Inc. [AMD/ATI] Baffin [Radeon RX 460/560D / Pro 450/455/460/555/555X/560/560X] [1002:67ef] (rev e5)
Subsystem: Tul Corporation / PowerColor Baffin [Radeon RX 460/560D / Pro 450/455/460/555/555X/560/560X] [148c:2385]
Kernel driver in use: vfio-pci
Kernel modules: amdgpu
01:00.1 Audio device [0403]: Advanced Micro Devices, Inc. [AMD/ATI] Baffin HDMI/DP Audio [Radeon RX 550 640SP / RX 560/560X] [1002:aae0]
Subsystem: Tul Corporation / PowerColor Baffin HDMI/DP Audio [Radeon RX 550 640SP / RX 560/560X] [148c:aae0]
Kernel driver in use: vfio-pci
Kernel modules: snd_hda_intel - The above information shows that the drivers for both devices are now
vfio-pci, indicating successful isolation. Record the IDs in brackets, which are[148c:2385]and[1002:aae0]for the display device and audio device, respectively. - Create
/etc/modprobe.d/vfio.confand addoptions vfio-pci ids=<id to block>in it. - Edit
/etc/mkinitcpio.conf, find the relevant project and add the corresponding content:1
2
3
4
5...
MODULES=(... vfio_pci vfio vfio_iommu_type1 vfio_virqfd ...)
...
HOOKS=(... modconf ...)
... - After editing, changes won’t take effect until you regenerate
initramfs:- Note: I don’t fully understand what this is about, and the ArchWiki content is also unclear to me. Here’s the actual operation I performed, which may not be the most correct method.
- Execute the command to regenerate
/boot‘s boot image:sudo mkinitcpio -g /boot/initramfs-4.19-x86_64.img(it’s recommended to back up the original) - After overwriting, restart the host system. If the settings are successful, the corresponding device drivers should be
vfio-pci. - After overwriting, the host system cannot access the isolated hardware; if you need access, select
initramfs-4.19-x86_64-fallback.imgto start from the unmodified version.
- Use the
4. Install and Configure Virtual Machine
After setting up the hardware, it’s time for software configuration.
- Install virtual machine management software
- tip: Here I installed QEMU and VirtManager, which simplify QEMU settings, along with libvirt. KVM is a module in the Linux kernel that can be used as long as virtualization is enabled on the motherboard; no additional installation is required.
1
sudo pacman -S qemu libvirt virt-manager ovmf
- tip: Here I installed QEMU and VirtManager, which simplify QEMU settings, along with libvirt. KVM is a module in the Linux kernel that can be used as long as virtualization is enabled on the motherboard; no additional installation is required.
- Create a virtual machine
- Open VirtManager, click “Create a new VM”
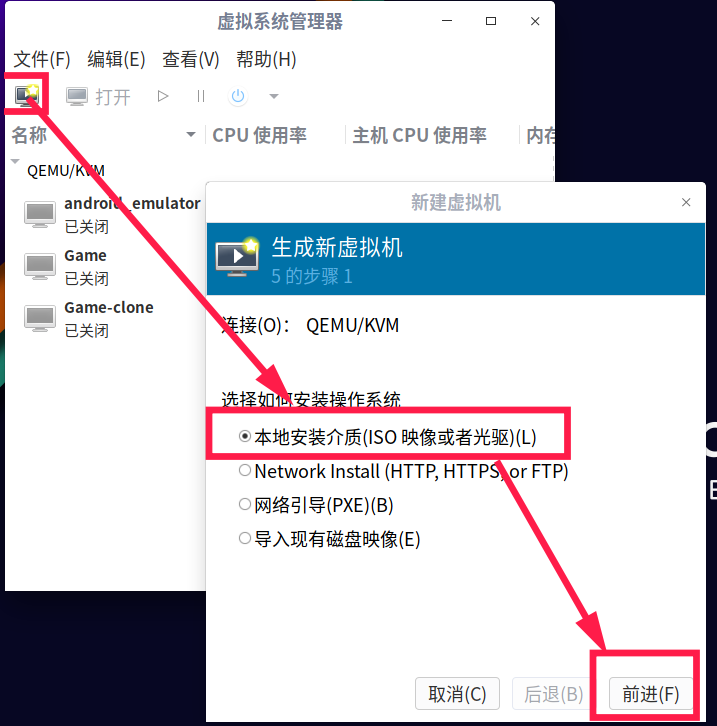
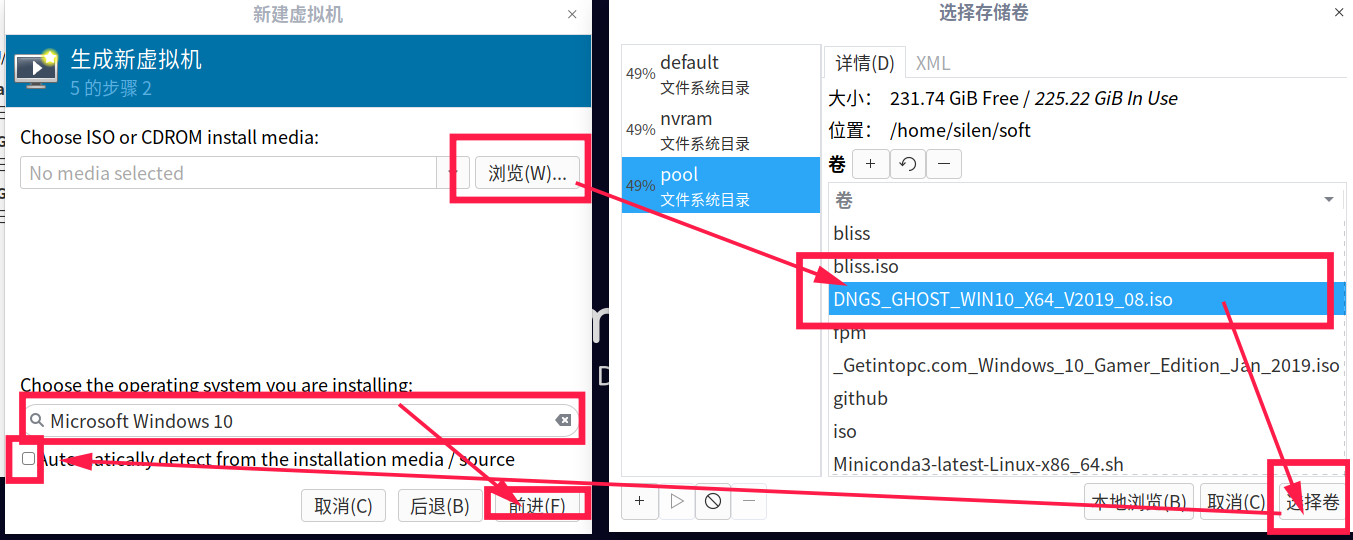
- Select the installation image (not for booting), since the downloaded image is not official, it cannot automatically recognize the system type. Remove automatic detection and manually select
Win10then proceed to the next step
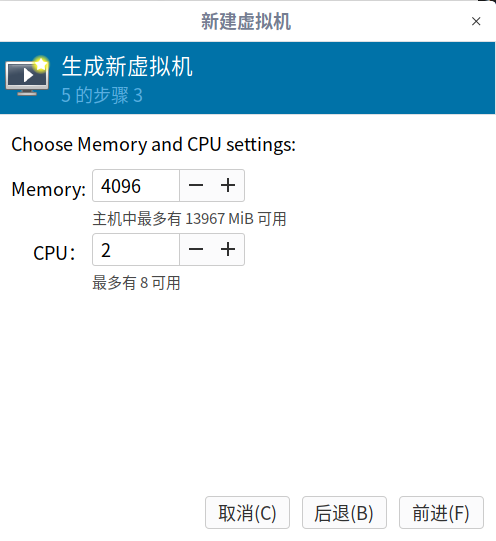
- CPU and memory allocation
- Choose to create a new image (skipping detailed steps…)
- Confirm information, select network as bridge, and further edit
- Allocate the PCI devices needed for passthrough
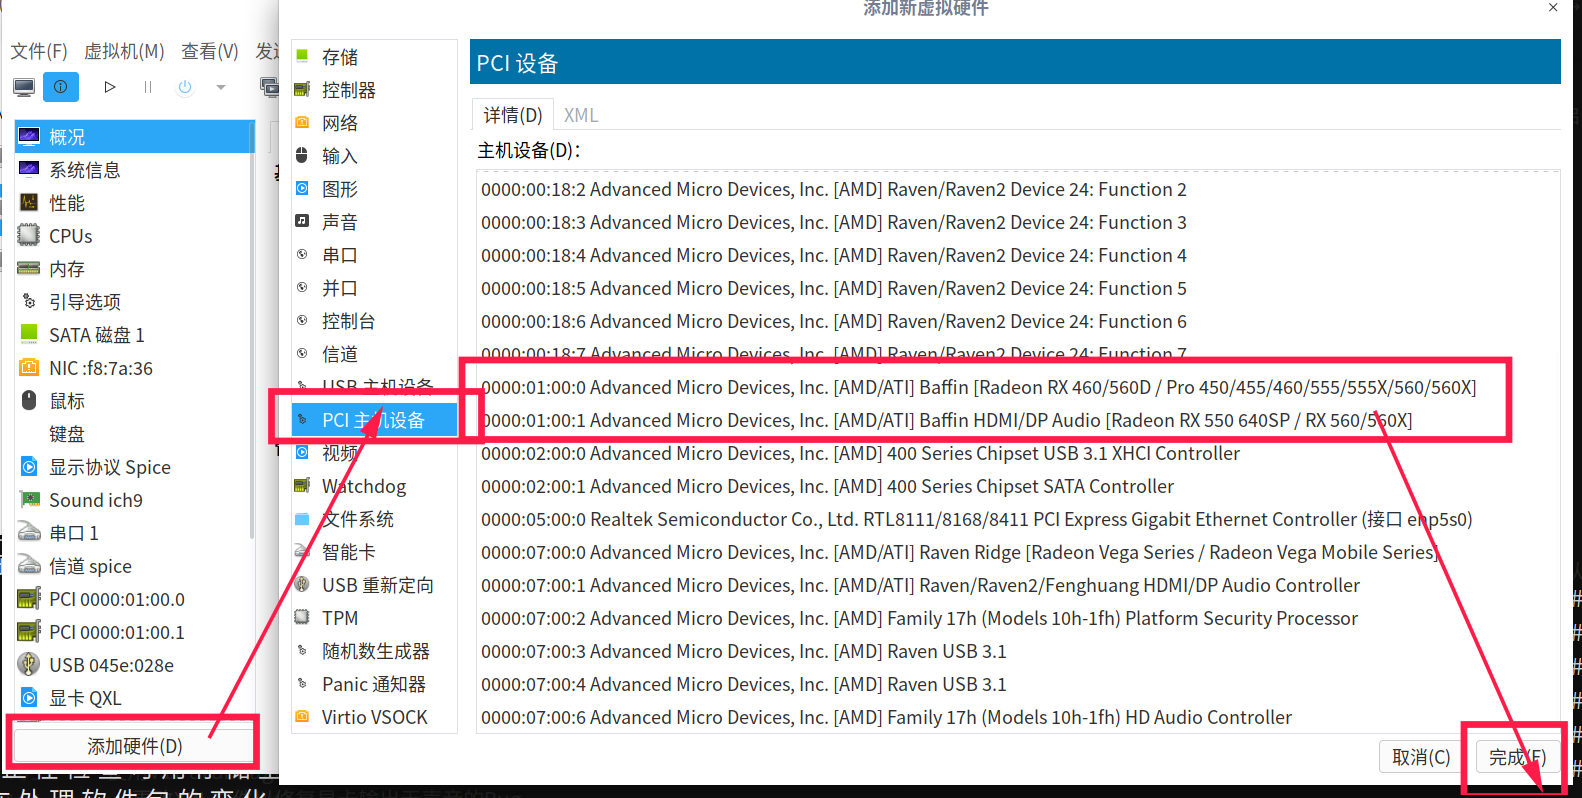
- Since my installation image does not support UEFI boot, I found another one that supports but lacks installation files. I need to make some small adjustments to the boot order to ensure it mounts and starts from the bootable image.

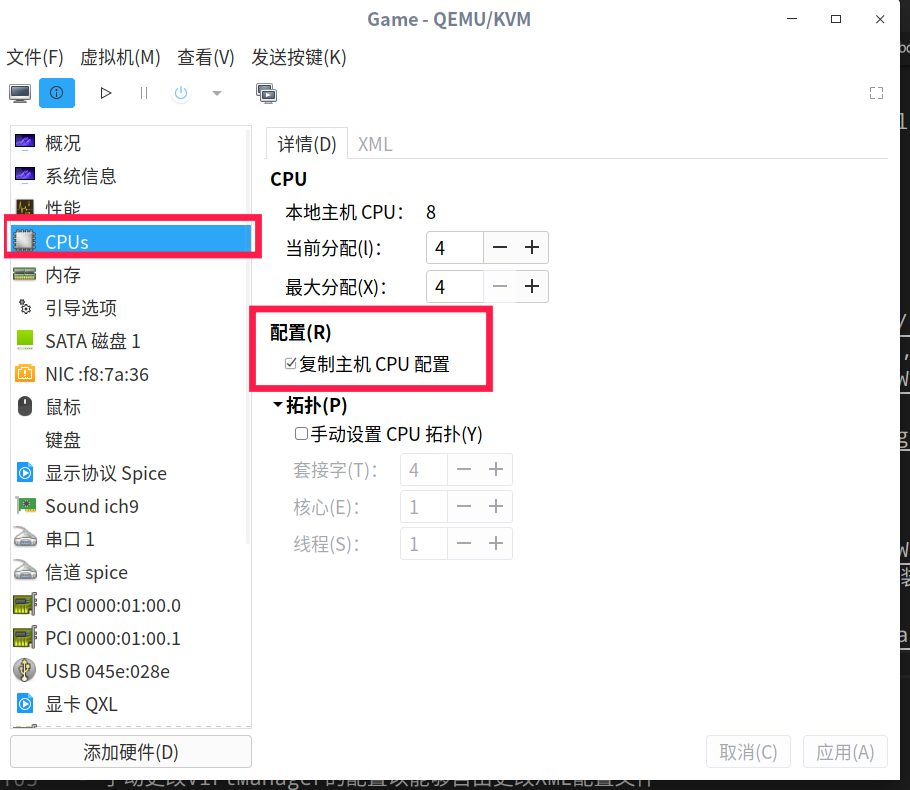
- Edit CPU information, mainly check “Copy host CPU configuration” (equivalent to
host-model)
- Set the BIOS to OVMF (refer to ArchWiki for details; I forgot to take a screenshot…)
- Click the top-left “Start installation” and proceed with the normal system installation.
- Open VirtManager, click “Create a new VM”
5. Audio Device Bug Fix and Other Issues
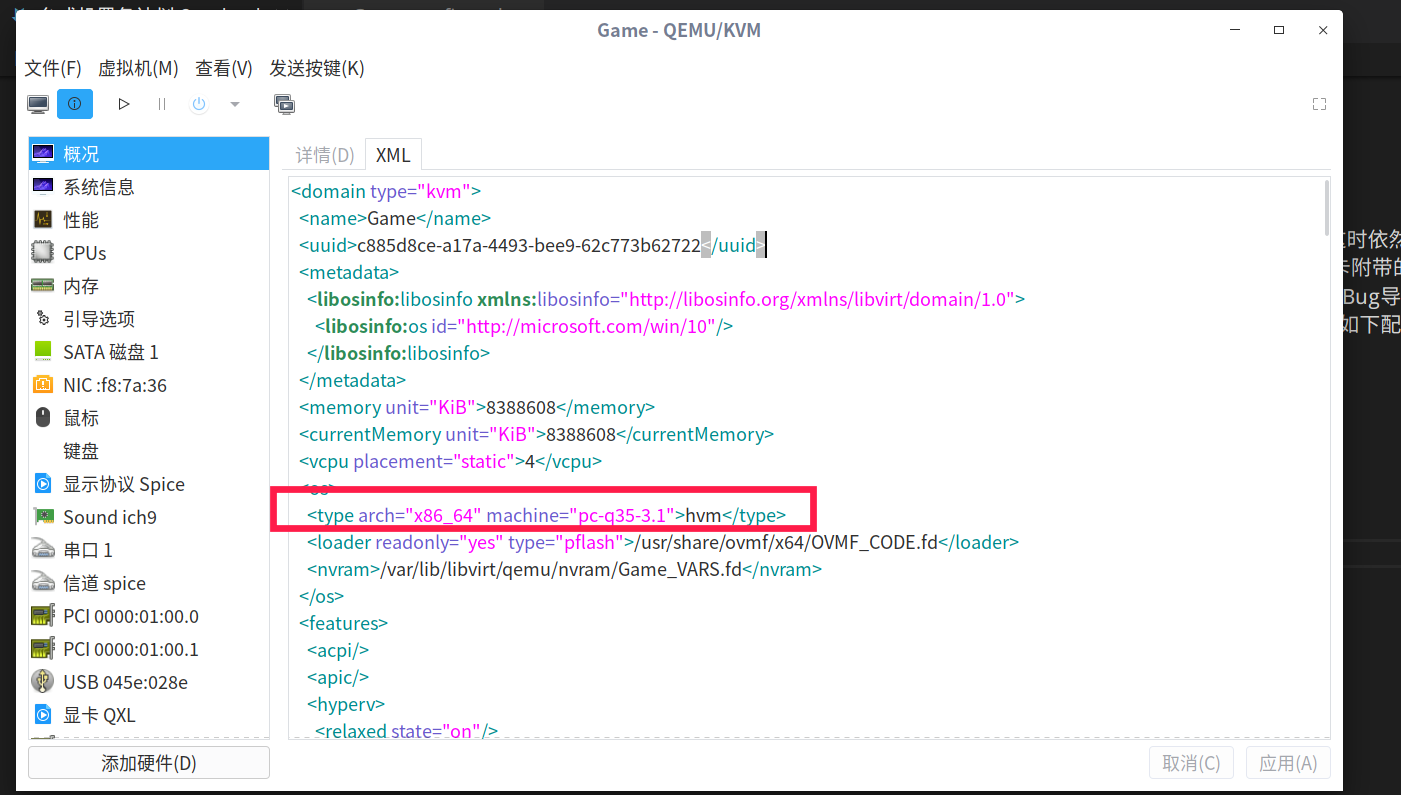
After completing the above steps and installing the system, a physical GPU virtual machine is set up, and connecting the display interface of the graphics card to any display device allows you to enjoy gaming happily. However, there’s still an issue: although the graphics card has built-in audio devices, theoretically, one HDMI cable should be able to transmit audio to my monitor’s speakers. But in fact, no audio devices from the graphics card are found in the virtual machine. This problem puzzled me for a week until I saw a similar issue on the Proxmox forum, which said this was a bug in Q35 4.0 and could be resolved by downgrading to version 3.1 in the virtual machine configuration file. Therefore, we need to manually edit the virtual machine’s XML configuration file (open it directly for editing), find the relevant entry, and change it to the following configuration:
1 | ... |
Finally… I can sit down and enjoy gaming properly~~~~~
Postscript: A 9.8 post that started writing was pigeonholed until almost 10.8…… The charm of猛汉王 is truly irresistible….````


